The Phil Wood folks took a look at the rear hub, and a piece of the pawl had chipped off and become lodged in the freehub mechanism (thereby disabling it). Once they'd removed the chip, everything worked just fine. They followed through with their agreement and have sent the wheel to Peter White (who hasn't yet received it). I appreciate the special service that Brent @ Phil Wood has given me, and I'm sorry I won't be riding a Phil Wood (except that it failed on me). Soon, soon I should have my rear wheel back.
But, in the meantime, I've begun the transformation of my Raleigh M500 to a single speed. The bike is 6 or 7 years old, and I like how it fits, so I hope it'll work well as a single speed. The first night I worked on it I got most of the components stripped off, the recycled cassettes were torn apart. I removed my old cassette, put on the spacers and one of the old 16 tooth rings. One set of the spacers didn't quite mesh with themselves, so I filed down some of the stubs - now they're a little off in a different spot. But, the rear cog is fairly secure. The bar-ends came off, which allowed me to see that I'd bent the end of my handlebar (it'll work just fine, the bend just made it hard to remove the shifters).
I ran to the bike shop to get some new grips, some new brake cables (old ones were original) and housing, and some shorter chainring bolts. Everything worked well, except the chainring bolts were the wrong size. Today they traded me for the properly sized bolts and I'll get the crank put back on tonight (with the 32 tooth chainring). Because of the mixup, the shop guy gave me the two replacement chain rivets for my Shimano chain (of course you cannot reuse the rivet on a Shimano chain... but everyone other chain allows it). All I have left to do tonight is actually shorten the chain, finish putting the chainring back on the crank, the crank back on the bottom bracket, and make sure everything is aligned properly. Woo-hoo! A new bike.
Tuesday, November 30, 2004
Shoes
I'm not much of a shoe person, I buy a new pair of shoes every year or so. Seriously, I'm still wearing the shoes that I wore on my honeymoon - and they were old then. And my tevas were bought just a week before, and they still look almost new.
Ever since we moved into the house I've wanted a pair of slip on shoes that I can leave by the front door to keep my feet dry and clean while I take out the trash or get the mail. But since I've got large feet, the slip-ons never seem to fit. I still can't figure that out. People make a shoe long enough for a size 13 foot, but don't make the opening large enough for my foot to get in.
Over the summer I almost bought a pair of keen sandals, but they didn't quite fit. I'm waiting for the size 14 to be available. They seem ultra comfortable, and do provide the toe protection to help out against stubbing. I'll just wait for spring to roll around to buy them. Besides, I've already bought my pair of shoes for the year.
While down at Moab I saw a bunch of people wearing some funny looking sandals:

I ran across the vendor's tent at the 24 hours of Moab and one of the guys convinced me to try on a pair (it wasn't that hard). It turns out that the Crocs are really comfortable - I recommend checking them out if you're in the mood for a sandal that sets you apart. Except for when I was riding my bike, I wore them the entire time I was in Moab. And, they're warm enough to wear in the winter here in Corvallis.
And, no, I did not get the sage-colored sandals. It was black all the way for me. The sage ones looked large enough to be a Cadillac.
Ever since we moved into the house I've wanted a pair of slip on shoes that I can leave by the front door to keep my feet dry and clean while I take out the trash or get the mail. But since I've got large feet, the slip-ons never seem to fit. I still can't figure that out. People make a shoe long enough for a size 13 foot, but don't make the opening large enough for my foot to get in.
Over the summer I almost bought a pair of keen sandals, but they didn't quite fit. I'm waiting for the size 14 to be available. They seem ultra comfortable, and do provide the toe protection to help out against stubbing. I'll just wait for spring to roll around to buy them. Besides, I've already bought my pair of shoes for the year.
While down at Moab I saw a bunch of people wearing some funny looking sandals:
I ran across the vendor's tent at the 24 hours of Moab and one of the guys convinced me to try on a pair (it wasn't that hard). It turns out that the Crocs are really comfortable - I recommend checking them out if you're in the mood for a sandal that sets you apart. Except for when I was riding my bike, I wore them the entire time I was in Moab. And, they're warm enough to wear in the winter here in Corvallis.
And, no, I did not get the sage-colored sandals. It was black all the way for me. The sage ones looked large enough to be a Cadillac.
Wednesday, November 24, 2004


Home Improvement
This past weekend we worked on the home. Minor things for most people, but I rarely do this kind of thing. The plan was to finish the study.
Mary had re-arranged the room, unpacking my books, buying me a ficus, putting up some framed pictures and all. It was looking real nice. The big project was the closet.
The closet had only one shelf (about 6' high) and one bar from which to hang clothes. It was a huge waste of space as the closet is 4 feet deep. So, we bought a closet corner organizer (C11), and some wire shelving (super slide - see this pic). Sounds easy, eh?
Before we did anything, we painted the closet and trim because they were looking ratty. And easy item.
Well, the first problem was that the cable modem installation was horrible. The Comcast dude just screwed the face-plate to the drywall, which promptly popped out (a good year and a half ago). Of course there's no power near that wall, so the coax cable is stretched across the room to the nearest power outlet. So my first task was to put in a proper outlet for the coax cable, as well as a power outlet. I did want to move the coax outlet b/c currently existed outside the location of the corner unit I was about to install.
Installing outlets in the walls (of the wood-framed walls, don't get me started on the exterior walls of our house which are poured cement) means cutting into the walls, always a scary prospect. I'd only done it once before - at the Portland house, and dad was telling me what to do each step. This time I was taking it on by myself - and I'd have to take the fall when I drilled through the bedroom wall ruining Mary's nice paint job. I measured 3 times, triple checked that the lines were all square and level, and began drilling and sawing holes in the wall. When I did the same thing in the Portland house I made the hole a little too large (the crumbly lathe & plaster contributed) and the face plate didn't quite cover the hole. Now I find out you can get oversized face plates. This time I was super careful about getting the hole just the right size, and I did. The next step was actually getting the wires up to the newly cut holes, which meant visiting the crawlspace.
I'm not a big fan of spiders, so it took me a little while to work up the nerve to crawl around under the house. Luckily, spiders weren't too keen on the crawlspace either. I crawled under the house and noticed that the cable installation dude missed drilling through the wall of the next room by about 2 inches - which just added to my annoyance at him. I wanted the power/coax on the other side of a stud in the wall - which meant I had to drill a new hole through the floor. After measuring several times, I put the drill bit to the underside of my house, and prayed I wouldn't drill up through the beautiful new hard-wood floors we'd just installed (er... had installed by someone else). After blinking the wood shavings out of my eyes (I know, I should have been wearing safety glasses) I looked up and saw daylight, daylight that was obviously coming from the two outlet holes I'd cut. yay!
Next I had to pull the coax cable out of the first hole and push it up through the new one I'd made. Of course the end connector was too large for the hole, so it got stuck and I had to cut the end off. This meant another trip to the hardware store. Do you know the difference between an RG6 and RG59 cable? Even knowing the difference, can you recognize one on sight? Me neither, but I had to choose which end connectors to buy. When in doubt, buy both. So I did. The hardware store dudes didn't know the difference, so they were no help, and my internet connection was down because I'd cut the cable myself - so the internet wasn't an option. I looked at the different connectors, they appeared the same - except for the size of the hole through which some of the cable passed. I looked at the cable and chose the smaller of the two connectors (RG59) and tried it out. It worked no problem. Turns out, the only difference between the two cable types is the amount of shielding, and the connectors can more or less be interchanged.
Now on to the electrical outlet. I just had to find an existing power cable to tap into, preferably the same one as the other outlets in the study. Of course, since this is a new-fangled house and has no basement, there were no cables to be seen in the crawlspace below the house (and it's a crawlspace - I barely fit underneath one section of pipes). What now?
The obvious choice is the attic-space, and as much as I didn't want to go under the house, I didn't want to wade through the sea of blown insulation, risking putting a foot through the ceiling in one of the rooms. So I called dad, who pointed out that I should check the electrical panel to see if the wires go up or down. Up. Damn.
So I poke my head into the space above the ceiling and look around for a while. No spiders, but lots of yellow insulation. I look right around myself and determine that I really don't want to dig through the stuff to try to find existing power lines - because I have no guarantee I'll even find them. And, even if I find one above the closet, it doesn't solve the problem of the outlet we want to put in the middle of the living roomfloor . I punt on the issue, figuring that the real solution is to add a new breaker or two to the panel, put in conduit outside the garage (where the panel is) leading to an opening in the foundation, to route power under the house - from which I can easily wire the closet - and the still-to-be-found-and-installed outlet in the living room floor.
Whew, lots of work for just two little holes, and only one is finished.
I patch up the old hole, assemble the corner unit, put it against the wall and find out the walls aren't square. Damn-it! The unit needs to be anchored to the wall (preferably a stud), so I figure I'll just add some shims to fill the gap so I have a nice strong connection. Of course the unit is in two pieces (top and bottom). I get the bottom all anchored in the wall, shims and everything. I then put the top half on, and it doesn't fit. One of the (three) supports is about half an inch out of alignment. son-of-a-bianchi! Long story short, I screwed in one of the shelves on the bottom half 1/2 inch off of where it's supposed to be done. I fix that and voila - the wall is suddenly square. The rest of the shelving goes up quickly. I seem to make more work for myself than I accomplish sometimes.
In the middle of all of this, our kitchen sink decides to no longer let water flow at more than a trickle. Huh? I begin to dismantle the entire sink - when Mary points out some easier places to start. We take the spout and knobs off and find a bunch of light turquoise sediment floating in the fixture. The sediment has the texture and look of the light green necco wafers I used to eat as a kid. I have no idea where it comes from, but after cleaning the stuff out, the water flows normally. whew.
On to the wire shelving (this is actually Tuesday b/c I'm too slow to do everything on a weekend). The wire shelving is actually pretty trick. You install the hang track across the top, and from that you just hang the standards, and hook in the shelf tracks and shelves. Installing the hang track was a little bit of a pain because I had to cut the track so that the pre-drilled holes could be lined up with the studs. And, of course, my stud finder was telling me the studs were 3.5 inches wide, so I worried about getting that all dialed in. You're supposed to secure the standards with a single screw - but it feels solid without that, and I'd like to have the option of easily moving the standards if I don't like the initial setup.
Now I've got a new closet. One with nearly 5 feet of hanging space (both shirt length and pant length) and at least triple the shelf space (21 feet) I originally had. I can easily add another 9 feet of shelf space. Hurrah!
The next task is actually putting my stuff away.
Mary had re-arranged the room, unpacking my books, buying me a ficus, putting up some framed pictures and all. It was looking real nice. The big project was the closet.
The closet had only one shelf (about 6' high) and one bar from which to hang clothes. It was a huge waste of space as the closet is 4 feet deep. So, we bought a closet corner organizer (C11), and some wire shelving (super slide - see this pic). Sounds easy, eh?
Before we did anything, we painted the closet and trim because they were looking ratty. And easy item.
Well, the first problem was that the cable modem installation was horrible. The Comcast dude just screwed the face-plate to the drywall, which promptly popped out (a good year and a half ago). Of course there's no power near that wall, so the coax cable is stretched across the room to the nearest power outlet. So my first task was to put in a proper outlet for the coax cable, as well as a power outlet. I did want to move the coax outlet b/c currently existed outside the location of the corner unit I was about to install.
Installing outlets in the walls (of the wood-framed walls, don't get me started on the exterior walls of our house which are poured cement) means cutting into the walls, always a scary prospect. I'd only done it once before - at the Portland house, and dad was telling me what to do each step. This time I was taking it on by myself - and I'd have to take the fall when I drilled through the bedroom wall ruining Mary's nice paint job. I measured 3 times, triple checked that the lines were all square and level, and began drilling and sawing holes in the wall. When I did the same thing in the Portland house I made the hole a little too large (the crumbly lathe & plaster contributed) and the face plate didn't quite cover the hole. Now I find out you can get oversized face plates. This time I was super careful about getting the hole just the right size, and I did. The next step was actually getting the wires up to the newly cut holes, which meant visiting the crawlspace.
I'm not a big fan of spiders, so it took me a little while to work up the nerve to crawl around under the house. Luckily, spiders weren't too keen on the crawlspace either. I crawled under the house and noticed that the cable installation dude missed drilling through the wall of the next room by about 2 inches - which just added to my annoyance at him. I wanted the power/coax on the other side of a stud in the wall - which meant I had to drill a new hole through the floor. After measuring several times, I put the drill bit to the underside of my house, and prayed I wouldn't drill up through the beautiful new hard-wood floors we'd just installed (er... had installed by someone else). After blinking the wood shavings out of my eyes (I know, I should have been wearing safety glasses) I looked up and saw daylight, daylight that was obviously coming from the two outlet holes I'd cut. yay!
Next I had to pull the coax cable out of the first hole and push it up through the new one I'd made. Of course the end connector was too large for the hole, so it got stuck and I had to cut the end off. This meant another trip to the hardware store. Do you know the difference between an RG6 and RG59 cable? Even knowing the difference, can you recognize one on sight? Me neither, but I had to choose which end connectors to buy. When in doubt, buy both. So I did. The hardware store dudes didn't know the difference, so they were no help, and my internet connection was down because I'd cut the cable myself - so the internet wasn't an option. I looked at the different connectors, they appeared the same - except for the size of the hole through which some of the cable passed. I looked at the cable and chose the smaller of the two connectors (RG59) and tried it out. It worked no problem. Turns out, the only difference between the two cable types is the amount of shielding, and the connectors can more or less be interchanged.
Now on to the electrical outlet. I just had to find an existing power cable to tap into, preferably the same one as the other outlets in the study. Of course, since this is a new-fangled house and has no basement, there were no cables to be seen in the crawlspace below the house (and it's a crawlspace - I barely fit underneath one section of pipes). What now?
The obvious choice is the attic-space, and as much as I didn't want to go under the house, I didn't want to wade through the sea of blown insulation, risking putting a foot through the ceiling in one of the rooms. So I called dad, who pointed out that I should check the electrical panel to see if the wires go up or down. Up. Damn.
So I poke my head into the space above the ceiling and look around for a while. No spiders, but lots of yellow insulation. I look right around myself and determine that I really don't want to dig through the stuff to try to find existing power lines - because I have no guarantee I'll even find them. And, even if I find one above the closet, it doesn't solve the problem of the outlet we want to put in the middle of the living room
Whew, lots of work for just two little holes, and only one is finished.
I patch up the old hole, assemble the corner unit, put it against the wall and find out the walls aren't square. Damn-it! The unit needs to be anchored to the wall (preferably a stud), so I figure I'll just add some shims to fill the gap so I have a nice strong connection. Of course the unit is in two pieces (top and bottom). I get the bottom all anchored in the wall, shims and everything. I then put the top half on, and it doesn't fit. One of the (three) supports is about half an inch out of alignment. son-of-a-bianchi! Long story short, I screwed in one of the shelves on the bottom half 1/2 inch off of where it's supposed to be done. I fix that and voila - the wall is suddenly square. The rest of the shelving goes up quickly. I seem to make more work for myself than I accomplish sometimes.
In the middle of all of this, our kitchen sink decides to no longer let water flow at more than a trickle. Huh? I begin to dismantle the entire sink - when Mary points out some easier places to start. We take the spout and knobs off and find a bunch of light turquoise sediment floating in the fixture. The sediment has the texture and look of the light green necco wafers I used to eat as a kid. I have no idea where it comes from, but after cleaning the stuff out, the water flows normally. whew.
On to the wire shelving (this is actually Tuesday b/c I'm too slow to do everything on a weekend). The wire shelving is actually pretty trick. You install the hang track across the top, and from that you just hang the standards, and hook in the shelf tracks and shelves. Installing the hang track was a little bit of a pain because I had to cut the track so that the pre-drilled holes could be lined up with the studs. And, of course, my stud finder was telling me the studs were 3.5 inches wide, so I worried about getting that all dialed in. You're supposed to secure the standards with a single screw - but it feels solid without that, and I'd like to have the option of easily moving the standards if I don't like the initial setup.
Now I've got a new closet. One with nearly 5 feet of hanging space (both shirt length and pant length) and at least triple the shelf space (21 feet) I originally had. I can easily add another 9 feet of shelf space. Hurrah!
The next task is actually putting my stuff away.
Friday, November 19, 2004
English Drink Cabinet
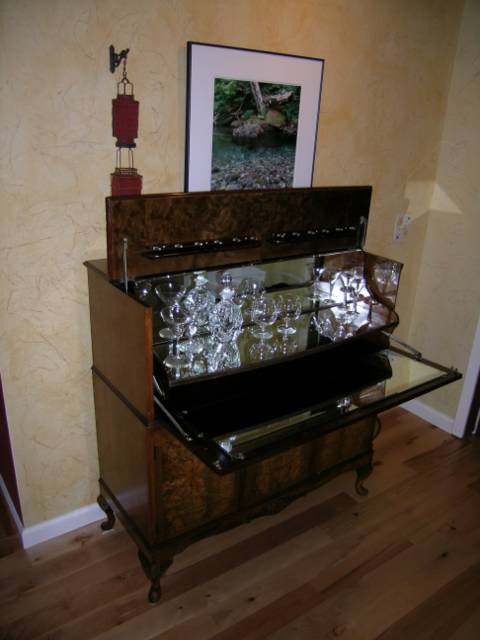
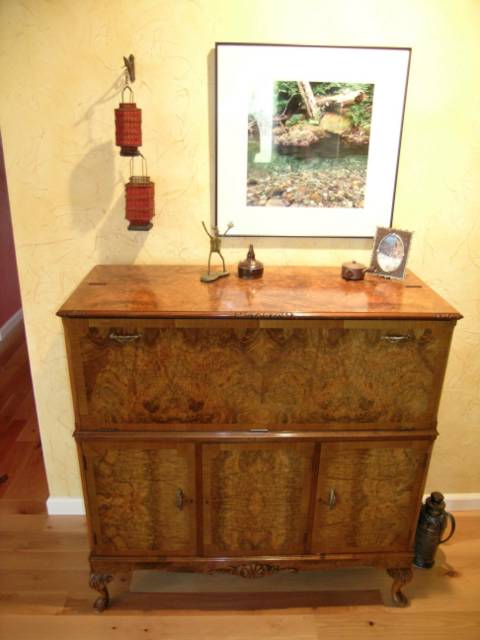
Mary and I purchased our first real piece of furniture about a month back, a 1930's English drink cabinet. I've posted some pictures below (here, here, and here).
It is probably the first piece of furniture that caught the attention of both of us. It's pretty plain and simple from the outside. The cabinet has a nice curly maple veneer, but other than that it is just a box with legs. But when you open up the top you're dazzled by sparkling mirrors on a shelf that rises up to greet you. It's pretty slick. The top portion that sticks up (you can see it in the second pic) has a couple little shelves with little metal clips that can hold short drink glasses by the stems. Two of the doors on the bottom open up to trays that slide out. Each tray is broken up into 3 rows, which hold 3 bottles of booze perfectly. And, original to the cabinet, in each of the doors there are 3 metal olive skewers. All-in-all, a very unique and interesting piece of furniture.
My parents gave me a crystal decanter they're not using, so we can look real classy when offering someone some brandy. Though I think we'll probably put port in the decanter as neither I nor Mary really care for brandy.
Now I need a drinking jacket and a pipe...

Thursday, November 11, 2004
Bike Notes
So the rear wheel is off to Phil Wood. They should have received it today (gotta check out my tracking number to see if it really did get there - I've had some bad luck with the USPS). The deal is that they'll examine it first, then send the wheel off to Peter White, who'll rebuild the wheel using a Chris King rear freehub (ISO disc, 36 hole, stainless steel hub shell) and new spokes. Phil Wood said they'd cover the cost of the rebuild (though I don't know if this includes new spokes or not, nor do I know about shipping). With any luck, I'll get a little money back because the Chris King hub costs less about $60 than the Phil Wood.
The hope is that I'll have better luck using a mesh gear system as opposed to the pawls. I sure hope so because I'm tired of this.
Thus, my nice Epic is out of commission for now. I could throw the rear cassette on the old rim and hub, but I'm afraid I'll just kill that hub - and I may have someone who's interested in buying it. Are you?
The next task on my list is to convert my old mountain bike to a singlespeed. I'm doing this on the cheap because Mary will kill me if I spend money on a bike I don't really use. The first steps are to remove the shifters and front derailer. You keep the rear derailer to use as a cheap chain tensioner. The after-market chain tensioners (surly, convert and others) cost upwards of $50, and are viewed as kind of kludgy. I figure, if I'm going kludgy, I might as well use the old derailer to save the money. Then you need to get a single rear cog lined up perfectly with the chain ring you wish to use. Again, the plan is to go cheap. I called up a couple of local bike shops until one actually was friendly enough (hurrah Cyclotopia!!!!) to see if they had any old Shimano cassettes in the trash. You see, if you bust apart the cassette you can get your hands on all the spacers that were holding the cogs at perfectly in alignment and use them to hold your single cog in perfect alignment with the chainring of choice. I'll probably start out with a 32-17 tooth combination, which is a little easier to pedal than the 2-1 ratio that's suggested as a good starting point. Then I use my chain tool to take out a bunch of the extra links in the chain to achieve proper tension and I'm ready to go!
If I invest any money in the bike it'll be for a set of platform pedals (I've still got the Speedplay Frogs on - which are a pain to use for just putzing around town) - estimated cost $10-15. If I actually ride the bike much, I'll probably need a new rear cog because the Shimano cogs are shaped specifically to make shifting easier - and you don't want your singlespeed to ever shift! A Shimano BMX freehub cog costs $5 (woo-hoo!) And then the luxury item would be some new handlebar grips because the other ones have worn through to the metal. At that point, I'd have a decent singlespeed that would work just as well for riding around town - total cost $30.
Now, ideally I'd like to get into riding the singlespeed bike, and I'll want a "clean" solution that wouldn't use a chain tensioner. The only practical way to do this (without buying a new frame or welding) is to get one of these nifty rear hubs: Eric's Eccentric ENO.. I'd then build a wheel around that, shorten the chain a little more, and have a beautiful singlespeed. I'd even be able to have a fixed gear if I wanted. It's a great Xmas gift idea!
Wednesday, November 03, 2004
Post Election Thoughts
So, it was kind of depressing to wake up this morning and hear the news. I had figured Bush would win, but was rather hopeful Kerry could pull it out. It's still possible for Kerry to win, but nobody really believes he will. The vote throughout the country was pretty heavily Republican, so I guess we get what we deserve.
I voted for a couple people in Oregon that won, but basically everything else that I voted for lost (except for the anti-SAIF measure).
Very saddening.
What's seems odd is that Oregon voted primarily Democratic, yet the ballot measures that passed (in my opinion) are rather conservative.
It will be an interesting 4 years. Either the Democrats will be able to say, "told you so" when things go to hell in a handbasket, or the Republicans can say, "we were right all along." Unfortunately, the policies the President sets doesn't really have an effect today, it has an effect years down the line. It's kind of like global warming - which, hey, Bush doesn't think exists either.
Time to drown my woes in some chai.
Tuesday, November 02, 2004
Subscribe to:
Posts (Atom)

